Get your free CO2 calculator
Grow the best plants with your FREE CO2 calculator.


After weeks of careful vegetative growth, your plants are finally ready to produce the buds you’ve been working toward.
This expert guide takes you through the stages of cannabis flowering week by week, so you can optimise every moment and maximise flower production.
Whether you're growing cannabis indoors or in a greenhouse, understanding the unique needs of your plants during this stage is key to producing high-quality cannabis buds.
From managing light intensity to spotting early signs of nutrient deficiencies and adjusting irrigation strategies, each week brings specific priorities.
Disclaimer: Any information given on this site is for educational purposes only. Please ensure if you’re growing cannabis, you’re doing so by the law and subject to appropriate permissions and licenses of the applicable country.

This guide focuses on photoperiod cannabis plants, which begin flowering in response to changes in light schedule.
Autoflowering strains, on the other hand, enter the flowering stage automatically based on age, not light cycles.
If you're growing autos, the structure and timings may differ slightly, but many environmental principles still apply.
Topping is a high-stress training method performed during late veg, where the main stem is cut just above a node to encourage two new main colas to form.
This technique helps spread out the canopy, increasing light exposure and allowing for more uniform bud development across the plant.
Topping also reduces apical dominance, making it easier to manage plant height and shape in tight indoor grow spaces.
In the first week of the flowering phase, you’ll initiate a 12/12 light cycle (12 hours of light, 12 hours of dark) to signal to your cannabis plants that it’s time to bloom.
This shift from the vegetative stage into the flowering phase prompts hormonal changes, particularly an increase in phytochrome far-red accumulation, that encourage flower initiation and bud site formation.
During this transition, in the first week of flowering, cannabis plants grow rapidly, with internodal spacing increasing as plants redirect energy into vertical expansion.
This stretch can last for up to three weeks, depending on the strain, genetics and environmental stability.

In coco, early irrigation should use smaller shot sizes with no runoff for the first 1–2 days.
This strategy builds substrate EC, setting the stage for strong nutrient uptake.
When cannabis plants enter flowering, introduce CO₂ enrichment at 1000 ppm, which has been shown to enhance photosynthetic rate and energy production, improving growth and floral set.
Monitoring these variables from day one ensures that flowering begins with vigour and balance.
Lollipopping is a plant training technique where you remove the lower growth on each branch that won't receive enough light to develop into viable buds.
This typically includes the bottom third of the plant, especially small, shaded flowering sites.
Lollipopping, done between days 7 and 10 of the flowering stage, redirects the plant’s energy towards the top colas where light is strongest, helping to produce bigger, denser buds.
It also improves airflow through the canopy, reducing the risk of mould and mildew later in flower.

As early flowering kicks in, you’ll notice white hairs (pistils) emerging from the flowering sites. These are the first visible signs of your female plants starting to bloom.
Buds begin to develop, and this is when you’ll see the earliest signs of your flowering cannabis.

Ensure your grow lights provide at least 800 µmol/m²/s PPFD at the canopy level.
Inadequate lighting, poor CO₂ supplementation, or imbalanced nutrients can hinder your cannabis plants’ growth process.
This is also when plants tend to show early deficiencies, so monitor foliage closely for signs of stress.
Continue feeding appropriately while monitoring EC stability.
Yellowing leaves, twisting, or stunted growth can indicate imbalances. Keep a close eye on new growth and overall posture—early detection is key.
According to Bugbee, the early flowering stage of cannabis is when carbohydrate demand rises.
Supporting this with consistent lighting and environmental stability ensures smoother flowering.
Start logging your environmental readings and plant responses to improve future runs.

By the third week of the flowering phase, the plant focuses more energy on growing buds.
You’ll notice budding sites multiplying and white pistils clustering—this is a strong sign that your cannabis plants are progressing well.
Now is a great time to begin defoliating or defanning—removing mature, lower fan leaves to improve airflow and allow more light to reach shaded areas.
Focus on leaves attached to the central stalk, and avoid disturbing the buds.
This targeted pruning reduces the risk of mould and mildew by improving canopy airflow.
Drip EC should be around 3, with a substrate EC of 6–8. Begin spacing out irrigation events based on dryback targets, promoting root zone health and nutrient uptake.
Maintain strong air movement throughout your grow room, and inspect all zones of your grow area for microclimate variations.
Look for hotspots or humid pockets that could impact uniformity and quality.

Week 4 marks the start of the bulk phase of the flowering stage.
You’ll notice white hairs thickening, buds growing denser, and a clear shift from structure building to flower packing.
You have now passed the early flowering stage of cannabis, and your cannabis is entering a critical point for bud development and weight gain.
If you’re using Sea of Green or Screen of Green, ensure your ScrOG netting supports an even canopy.
This helps create equal spacing for light penetration and airflow, setting the stage to maximize flower production.
Stay consistent with flowering nutrients to drive cell expansion and trichome development.
Potassium and phosphorus are especially important now.
Monitor the lower canopy of your plants, which may be shaded or less active, for early signs of overfeeding or deficiencies.
Use this week to double-check that cannabis plants receive even airflow and that no microclimates have formed in shaded corners of your grow space.
Take notes on how each strain reacts—this information will be invaluable for fine-tuning future cycles.

At this stage of the flowering phase, your cannabis plants require careful observation.
Buds continue to swell, but much of the action is internal—cells are dividing rapidly, and resin glands begin ramping up production.
Some white pistils may start turning orange—this is completely normal at this stage and not a sign of early finish.
Buds continue to develop steadily, and trichomes begin to become visible to the naked eye, especially on sugar leaves and calyx tips.

Nutrition during the flowering stage becomes even more critical, as cannabis plants demand higher phosphorus and potassium levels to support bud development and structural fortification.
Stick with high-quality nutrients tailored for flowering cannabis, ensuring micronutrients like magnesium and sulphur are present to prevent subtle deficiencies.
Too much nitrogen can still cause leafy buds and slow bud growth, so aim for a lower N ratio in your feed.
Substrate EC should remain between 6 and 10, and drybacks between irrigations should now extend slightly to encourage root strength.
Watering cannabis during the flowering stage must be matched to daily environmental demand. Avoid overwatering to prevent stress and reduce the risks of mould and mildew.
Flowering cannabis plants require a stable pH of 6.0–6.3.

By Week 6, bud swell becomes obvious—your flowering cannabis is now transitioning into full reproductive focus.
Growing buds gain density, trichome production increases, and aromas intensify.
You’ll see calyxes fattening, pistils darkening, and aroma intensifying across the canopy.
This is a crucial window for cannabinoid and terpene development.
It’s also time for your second round of defoliation: remove large, light-blocking fan leaves from the mid and upper canopy to expose shaded flowering sites and improve airflow.
Defoliating at this stage also reduces relative humidity within the canopy, helping prevent bud rot.
Be selective—focus on removing mature leaves that no longer contribute to photosynthesis or block light from reaching lower flowers.
This helps your plant focus on ripening actual buds efficiently.
Continue feeding your cannabis plants with balanced nutrients, ensuring potassium levels are elevated for optimal flower production.
Check for signs of deficiencies, particularly calcium or magnesium, which can emerge due to heightened metabolic demand.
Maintain substrate EC around 8–10.

Week 7 signals the start of the late flowering stage.
You’ll notice a visible shift in your flowering cannabis plants—white pistils begin darkening, calyxes swell, and terpene production increases.
Energy is now concentrated on resin synthesis and cannabinoid expression.
Bud growth slows, but internal chemistry intensifies.
Begin your final defoliation pass to remove mature sugar leaves that block airflow or light penetration to lower budding areas.
This improves drying potential and helps you spot early signs of mould or nutrient deficiencies.
Be gentle—cannabis plants in flower tend to be more sensitive to physical disturbance at this stage.
Stick with your flowering feed, but monitor nutrients left over in the medium.
As the final weeks approach, note any changes in aroma, trichome colour, or bud firmness.
Documenting these observations is crucial for refining your cannabis cultivation strategies over future cycles.

In the 8th week of flowering, cannabis reaches peak maturity indicators.
Trichomes begin shifting from clear to cloudy, and some may turn amber—this is the clearest sign that the plant is nearing harvest readiness.
Around 10–30% amber trichomes typically signal ideal THC levels, though ratios can be adjusted depending on desired effects.
White pistils have mostly darkened and receded, and your actual buds should now be dense and fragrant.
Resin glands swell visibly, especially in indoor gardens with well-controlled temperature and humidity.
Monitor the flowering process closely using a jeweller’s loupe or microscope.
Ease off feeding and check the pH of your runoff.. This is the time to consider a pre-flush to remove leftover nutrients from your grow medium, particularly in coco or hydro setups.
Properly matured buds at this stage promise better flavour, burn, and potency—don’t rush it.

The last few weeks of the flowering stage are all about ripening and readiness.
Your buds should now be coated in trichomes, with most white pistils turned brown or orange and curled inward.
Trichomes should now be mostly cloudy with 20–30% amber, suggesting peak potency and signalling harvest is close.
If you haven’t already, start flushing now.
Begin a full flush by watering with plain, pH-balanced water (6.0–6.3) to remove remaining nutrients from the root zone.
This improves taste, smoothness, and combustibility post-harvest. In coco, flush for at least 5–7 days.
Monitor runoff EC to ensure excess salts are being cleared.
Inspect buds daily for signs of mould or pests.
Even if you’ve used feminized seeds, inspect buds for rare pollen sacs caused by stress-induced hermaphroditism.
Gently bend stems—if they crack slightly, it’s a common harvest readiness cue.
These last steps solidify yield quality and structure your cycle for success.
Harvest decisions should be based on trichomes, aroma, density, and plant response, not just the calendar.

Some sativa-dominant cannabis strains and tropical landrace varieties require up to 12 weeks to fully mature in flower.
During these extended weeks, developing buds continue to increase resin output, bulk, and cannabinoid concentration, though often at a slower, steadier pace—so don’t rush the finish.
Trichome inspection is essential now. Look for a mix of milky and amber heads across multiple bud zones, not just the top colas.
Allowing 20–30% amber trichomes can maximise sedative or full-spectrum effects.
If you haven't already, continue flushing with clean, pH-balanced water (6.0–6.3).
This helps remove remaining nutrients, allowing the plant to mobilise stored elements for a smoother smoke.
If growing a cultivar known for delayed ripening, patience pays off. Rushing harvest at this stage can undercut flavour, aroma, and potency.
Monitor plants daily, and don’t rely on a single indicator—your final call should be based on trichomes, pistils, and bud firmness combined.

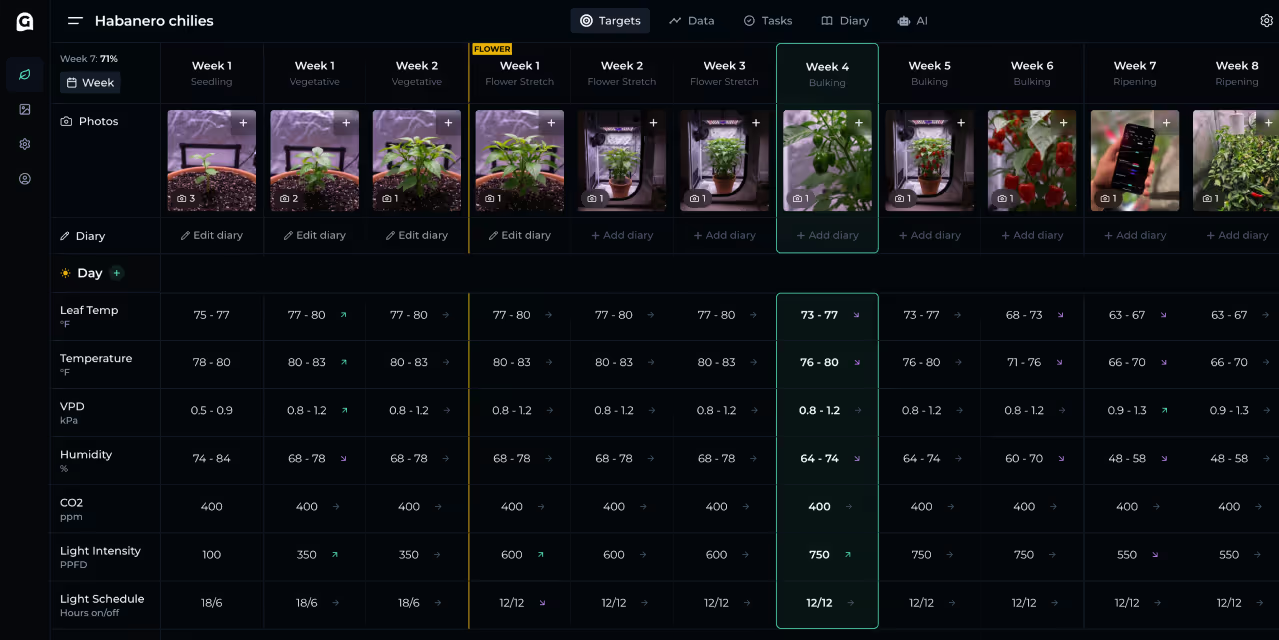
Here’s a recap of the ideal environmental parameters flowering plants require:
Track these settings weekly to maintain ideal growing conditions and maximise flower production in your grow room.

Cannabis flowering stage nutrition is crucial for plant performance and resilience.
Use the best nutrients for cannabis in the flowering stage with a balanced PK ratio and ensure suitable water quality.
Maintain pH between 6.0 and 6.3 to improve nutrient uptake and root systems.
Monitor EC levels in both the drip and substrate.
Use crop steering to adjust irrigation frequency and volume to match the stage of growth and medium dryback.
Good irrigation practice improves the development of buds and plant health, especially when growing indoors in coco.
Remember to avoid overwatering, which can harm your flowering plants.

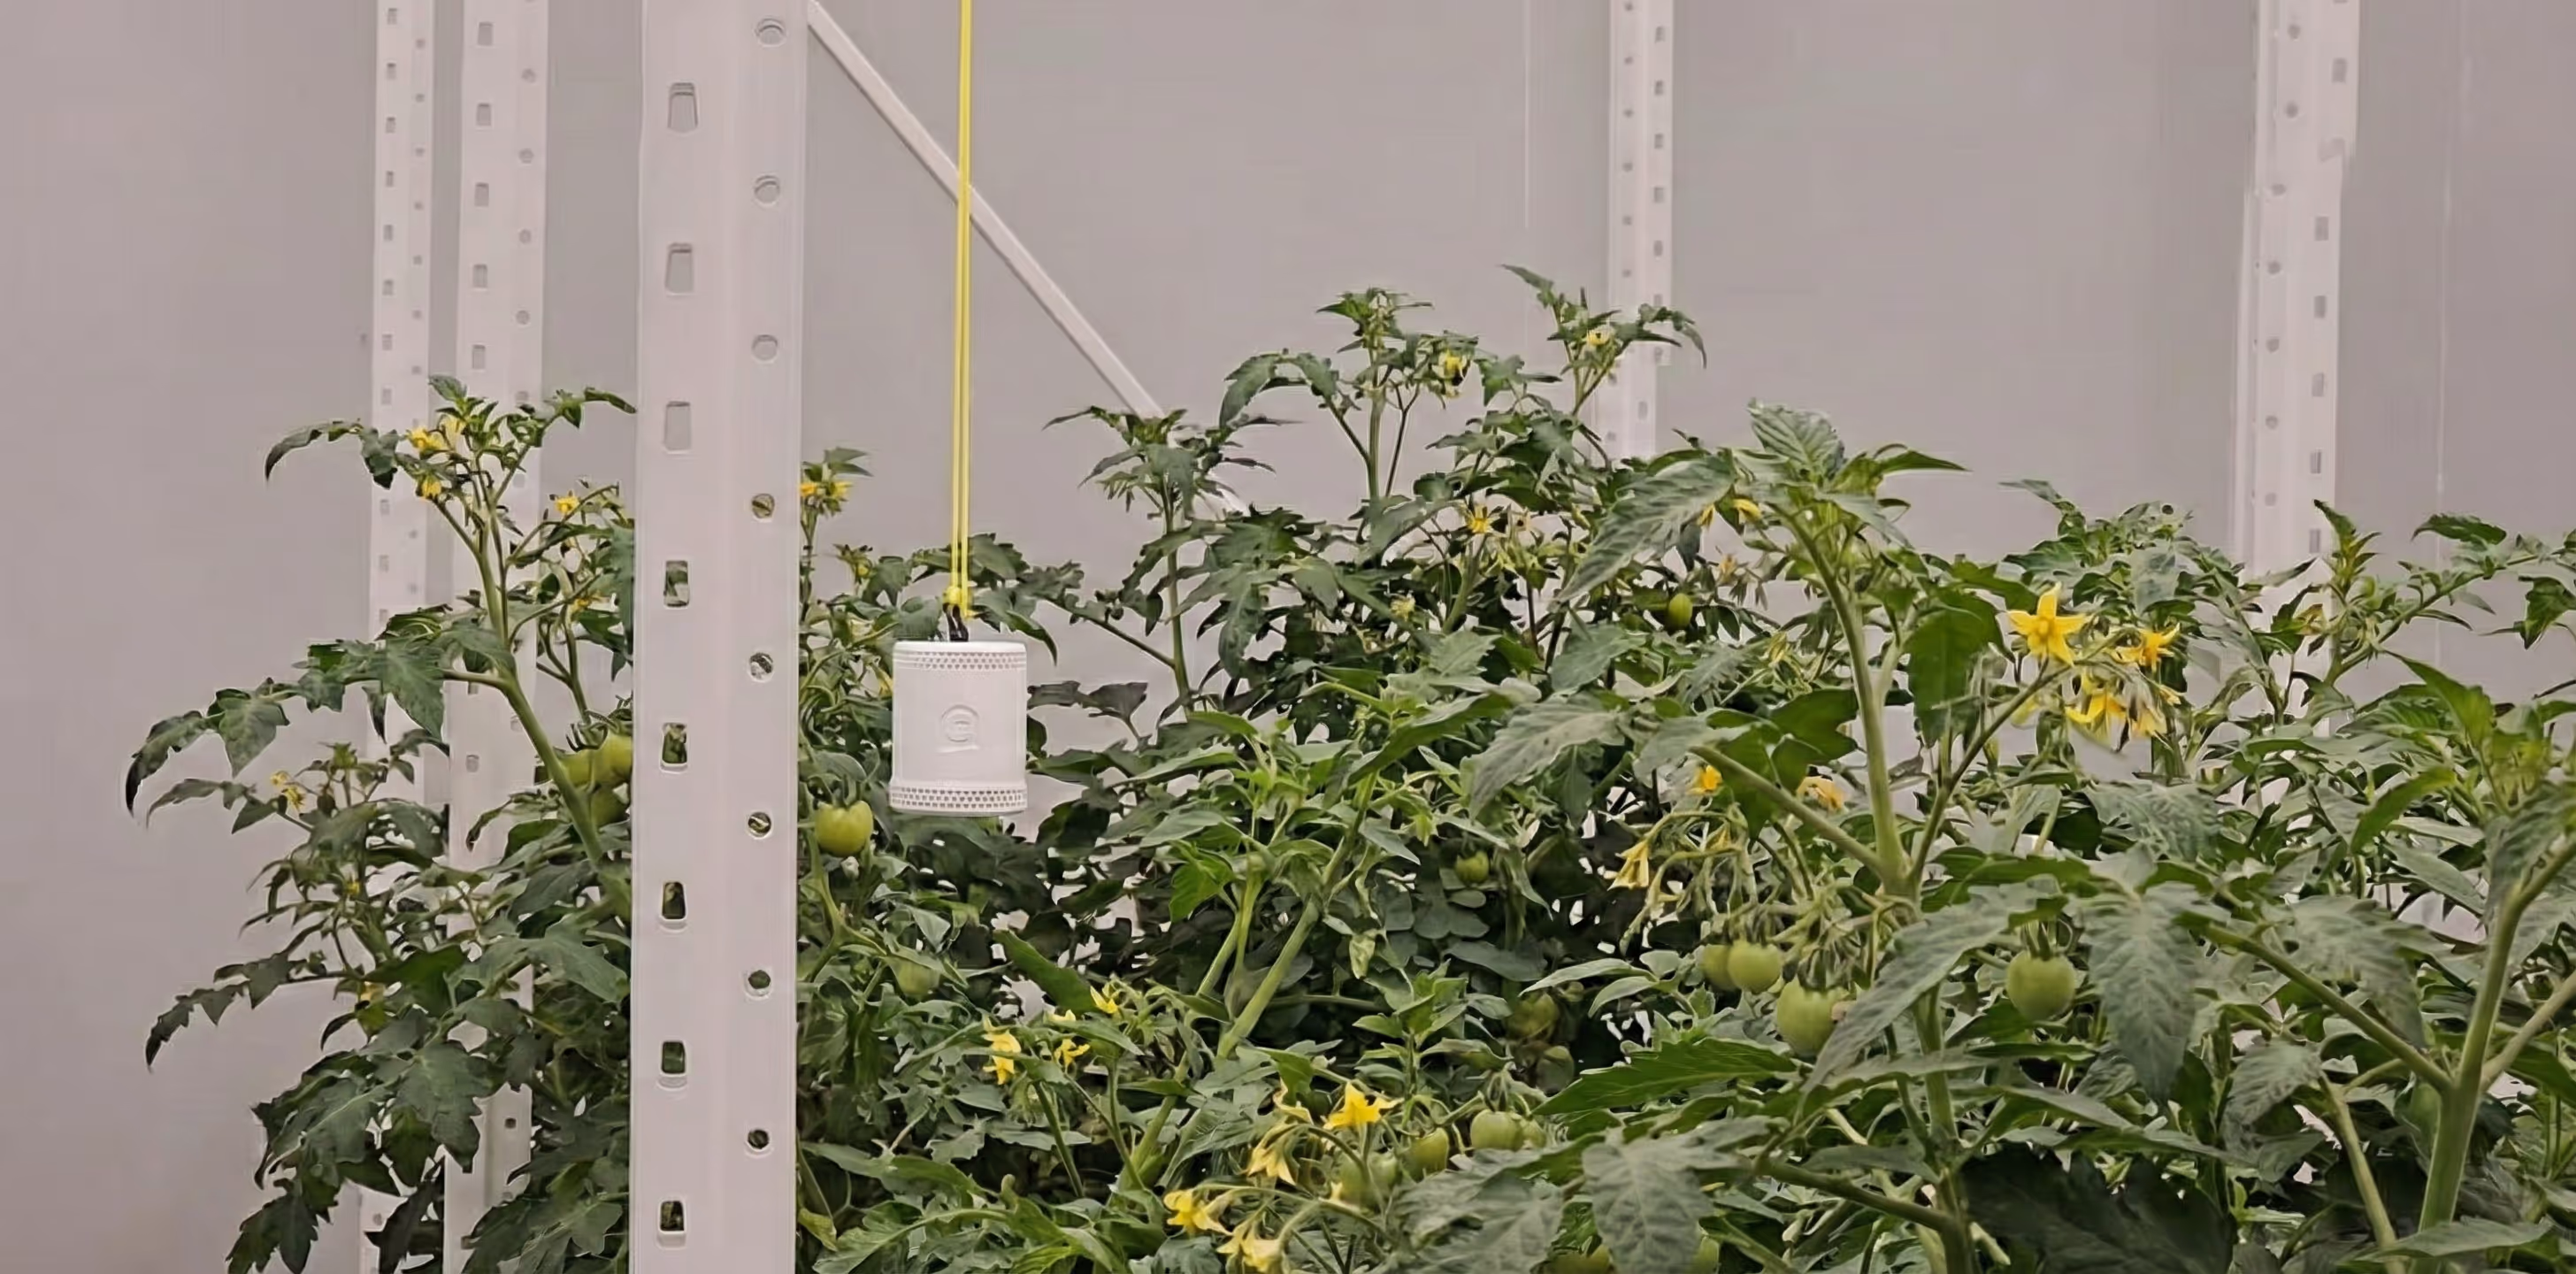
Nothing beats real-time, in-canopy data to truly dial in your flowering environment—and that’s exactly what the Grow Sensor delivers.
Unlike traditional climate sensors that sit high above the canopy, Grow Sensor lives where the action happens: right next to your developing buds.
It tracks light intensity (PPFD), temperature, VPD, and relative humidity with pinpoint accuracy, giving you a real picture of what your flowering cannabis is actually experiencing.
It’s wireless, waterproof, and battery-powered, so you can move it around as your canopy evolves throughout the flowering cycle.
For even deeper control, the Grow Sensor Soil Probe plugs directly into your Grow Sensor.
It gives real-time data on substrate conditions, including EC, water content, and temperature, right at the root level.
This insight is especially useful for coco and soilless media, where managing drybacks and salt buildup is key to healthy flowering.
With the probe in place, you’ll know exactly when to irrigate and how much, helping you steer crops more precisely and avoid common issues like overwatering or underfeeding.
It's an ideal companion for anyone using crop steering strategies or aiming for high-performance cultivation.

By measuring at the plant level, Grow Sensor helps you fine-tune your grow lights, CO₂ levels, and airflow to avoid issues like bud rot, uneven bud development, or poor bud production.
The app gives you a rolling VPD target based on current conditions, so you can proactively adjust your environment before your cannabis plants show stress.
Grow Sensor is an essential tool if you’re serious about maximising product quantity and quality, tracking performance trends, and making data-backed decisions week by week.
It empowers you to understand what conditions your cannabis plants are under daily, giving you total control over every variable that shapes your final yield.

Plant management directly influences yield and bud quality.
These methods help to focus energy on the top colas, producing bigger buds.
Monitor the airflow through your grow space and use these techniques to reduce the chance of moisture-related problems.

Monitor for signs of deficiencies, pests, and environmental imbalance throughout the flowering process.
Collect consistent data on height, EC, water content, and phenotype traits. This helps fine-tune future cannabis cultivation runs.
Harvest when the majority of pistils have turned and amber trichomes dominate the buds.
Watch out for pollen sacs, especially if you didn’t use feminized seeds.
Most growers find that closely observing the final 2 weeks helps them decide the harvest window.

The flowering stage is where all your effort pays off.
By following a week-by-week approach and tailoring your inputs to each phase of flowering, you’ll get the most out of your grow space.
Stick to the guidelines above, observe your cannabis plants closely, and make adjustments as needed.
With the right strategy, your flowering plants will thrive and reward you with top-tier buds.
Happy growing!

The best humidity for the cannabis flowering stage is 65–75% in early flower, gradually lowering to 50–55% by late flower to reduce the risk of mould and support dense flower development.
The best temperature for the flowering phase is 28–29°C (82–84°F) during the day and 20–24°C (68–75°F) at night, with slightly cooler temps in the last weeks to enhance ripening and colour.
Most cannabis strains spend 8–12 weeks in the flowering cycle, depending on genetics and grow style.
After the pre-flowering stage, your cannabis plants enter full bloom, shifting energy from vegetative growth to bud development.

Once your cannabis plants have transitioned out of vegetative growth and into the cannabis flowering phase, you can start removing fan leaves around the first few weeks of the cannabis flowering stage.
Defoliation helps expose bud sites to more light intensity, improving airflow and reducing the risk of bud rot.
Clearing excess foliage allows the plant’s energy to focus on buds rather than unnecessary leaf mass.
Many indoor growers time this with the second week of flowering, ensuring leaves blocking lower bud sites are carefully removed without stressing the plant.
You’ll know your flowering period is nearly complete when white pistils darken and curl in, and amber trichomes appear on the cannabis buds.
The final weeks of your cannabis plants’ flowering cycle are marked by slowed bud growth and a stronger aroma.
Most cannabis strains are ready when around 70% of pistils have darkened.
During the cannabis flowering stage, your plants need tailored care to support bud development and flower production.
Balanced nutrients are vital to fuel growth without causing deficiencies.
Stable temps, humidity, proper light intensity, and a consistent light cycle help maximise quality and quantity.
Enhance your gardening skills – subscribe to the Grow The Best newsletter today!


.avif)